IAM FAQ
IAM FAQ This FAQ page was last updated on January 25, 2013.
First of all, IAM is sort of like public television in that while we do require a payment (including BME image/video and story donations) to sign up and sustain a page, we survive largely on donations - the small fee we charge barely covers our costs. Finally, by helping BME with images and stories, you are also helping IAM (since BME currently shoulders most of IAM's debts).
Please view the IAM TOS page for more information about the rules of the site.
Paying For IAM
An IAM Legacy Subscription costs $10. It rebills at $10 every six (6) months. You can uncheck the auto-renew option on sign up or cancel your rebilling at any time. This will not affect your current subscription and you will still be able to access your IAM page until your rebilling date at which time your account will expire.
Please note that an expired account does not mean you will lose everything. Your IAM page will not be deleted when you expire.
If your IAM page is not set to automatically rebill you will not be able to purchase a new IAM subscription until your current one expires. Make sure that you are logged in to your current account and use the subscribe page to purchase a new IAM subscription. If the option isn't there, you haven't actually expired yet and you will need to wait until you do. If it asks you to enter an email address and username, you are not logged in, if you proceed you will end up creating a brand new account rather than crediting your current one. Use the login link at the top of the page to log in and then proceed with purchasing the new subscription via the subscribe page.
If you are expired, clicking on any IAM links will also automatically take you to the subscribe page in order to purchase more time. As always if you have any questions or run into problems, contact BME support for assistance. Make sure you include the email address associated with your account.
You can also keep your IAM page active by having an active BME subscription (either paid or through submissions) as IAM is included with a BME subscription.
Credit Cards
BME accepts all major credit cards. We follow the most stringent guidelines and abide by strict rules to protect the integrity of our members personal information. Your card details are not viewable by anyone other than the last 4 digits and the expiration date, which is common among all websites. If you have any concerns or questions please feel free to contact BME support.
Logging In
Logging in to IAM is the same as logging in to BME. You log in with your email address (the email that was associated with your IAM page) and your password. You can go here to log in.
Customizing Your IAM Page
You can fully customize your IAM page by adding your own logo, changing the background, or altering the colors of various parts of the site.
Upload a custom logo: This will change the background for the BME logo in the title/navigation bar. Upload your image and then select on the following page what part of the image you'd like to have displayed.
Upload a background image for your page: This will add an image to the background of your IAM page.
You can customize any of the following colors by entering a hex color code. Please note you must include the # (number sign) in front of the hex code in order for it to work.
- Page background - This changes the background colour on your page. It will not be visible if you have uploaded a background image.
- Page header background - This changes the top part of the page that says BME as well as the navigation bar where your new forum posts and new messages are indicated.
- Page header title - This changes the colour of the links at the top of the page (Gallery, IAM, Zine, etc.)
- Page header text -
- Page header hyperlink -
- Header Navigator -
- IAM header background -
- IAM header title -
- IAM header text -
- IAM header hyperlink -
- IAM main background -
- IAM main heading -
- IAM main title -
- IAM main text -
- IAM main hyperlink -
- Page footer background -
- Page footer title -
- Page footer text -
- Page footer hyperlink -
Diary Entries
This is where you manage your diary entries on IAM. Add new diary entries as well as edit your older entries.
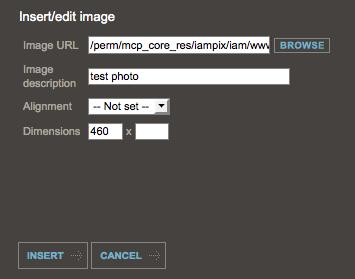
If you want to add an image to your diary, click on the little icon that looks like a tree.
If you want to change the size of the image, enter the pixel dimensions in the box. If you're not sure how to retain the proper dimensions, only enter a number into one side.
IAM uses a WYSIWYG editor. This same type of editor is found on most blogging sites and forums and makes editing much easier. If you are unfamiliar with this type of editor or what the icons mean, an explanation is provided below. Additionally, hovering your mouse over one of the icons will tell you what it is.
Top Row Icons
- B - Bold
- I - Italics
- U - Underline
- ABC with a line through it - Strike-through, this draws a line through your text as if you crossed it out.
- A underlined - This icon lets you choose the color of your font.
- AB highlighter - This allows you to highlight text, you can choose which color to use for the highlighter as well.
- Align Left - Aligns your text to the left.
- Align Center - Aligns your text in the center.
- Align Right - Aligns your text to the right.
- Align Full - Aligns your text to the left and right, creating a block text look.
- Unordered List - This gives you a bulleted list.
- Ordered List - This gives you a numbered list.
- Outdent - Pushes text back to the start line.
- Indent - Indents text further from the regular start line.
- Subscript - Sets text below the normal writing line.
- Superscript - Sets text above the normal writing line.
- Insert/edit anchor - An anchor is a named zone in your website that allows you to jump from once place to another within a page or to a specific place on another page in your website.
- Insert Horizontal Ruler - Adds a horizontal line separating top and bottom text.
- Insert/edit link - Adds a hyperlink.
- Unlink - Removes or ends a hyperlink.
Bottom Row Icons
- Paragraph - Adds paragraph formatting.
- Font Family - Lets you choose which font you want to use.
- Font Size - Lets you change the size of your font.
- Undo - Undoes what you just did!
- Redo - Redoes what you just undid!
- Insert custom character - Allows you to choose a custom character to add to your text. This appears in a pop up window with a choice of characters.
- Emotions - Allows you to add emoticons (smiley faces) to your text.
- Toggle spellchecker - Turns spellchecker on so you never misspell a word again!
- Remove formatting - Removes html formatting.
- Cleanup messy code - This option helps remove unnecessary coding from your content.
- Insert/edit image - Opens up a window that allows you to browse for an image and upload/add it to your diary page. This button can also be used to edit an image you've already placed in the diary.
- Edit html source - Allows you to view your diary entry in HTML format and edit it that way. This should only be used if you understand HTML and are comfortable making changes in it.
Posting Videos
If you want to post a video in your IAM diary, for example, a video from YouTube, you will need to use the old object code. The newer iframes code will not work.
Albums
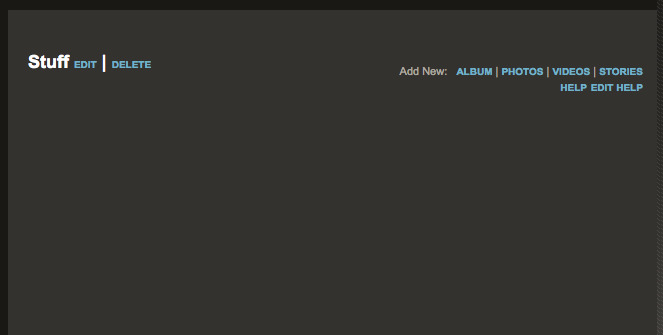
To delete an album from your profile you need to first make sure that the album has no content in it. Once the album is empty you will see the option to either edit or delete the album.
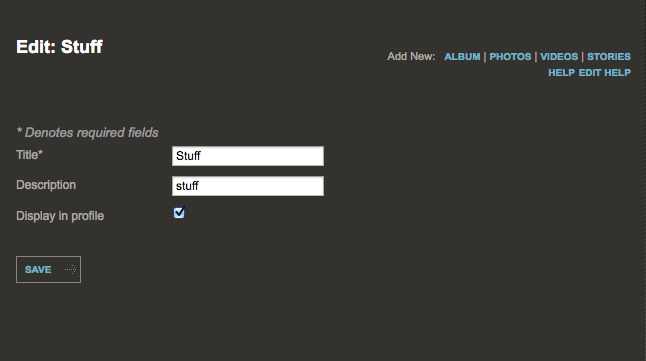
If you want the album to show up on your IAM page, click on the edit button. In the next screen you will see a check box with "display in profile" next to it. Checking that box will make the album display on your IAM page. The album needs to have content in it in order to display.
Mod Tracker
The following instructions can be used to add visible photo albums to your IAM profile page.
1. Go to "edit profile & account"
2. Click "media" on the left hand side.
3. Click on "Add a new album". For the sake of this explanation I'm calling it "ModTracker". You can name it however you want. Here's the important part, there's a little box and beside that it says "Display in profile". Check that box! You can go back into your edit settings and do this if you've forgotten to do it.
4. Either click on the photos you from your already uploaded media that you want to add or add new photos. Choose "ModTracker" as the folder to put them into. They will now show up on your IAM page.
Forums
This is where you manage your forums. You can add or delete forums from your page.
Petition
This is where you add petitions to your page as well as managing current petitions on your page.
Polls
This is where you add polls to your page as well as manage current polls that have already been added.
My Events
This is where you add an event to IAM that you are hosting. Click the "Add Event" page to get started.
Link to a BME experience
This is where you select an experience submitted to BME to display on your page. Click the "link to a BME experience" in order to get started.
People I'm following
These are the people that you're following. This is similiar to the function on the old IAM.Alive that told you when a person that you added to your IAM.Alive updated their page. This helps you to keep track of pages that you want to view.
People who follow you
This is the list of people who want to be notified when you update your page. This means they are interested in what you're doing, not that they are just some creepy stalker so take it as a compliment. If you feel that someone is abusing this function, please report it.
Visitor Tracker
This function tracks recent visitors to your page. You can find the settings for the tracker by going to edit profile & account and scrolling down to where it says privacy settings. To enable a tracker that only you can see, select the box marked Track Visitors to my profile. If you want your tracker to be visible on your IAM page you can also select the box titled Show visitors on my IAM page.
Privacy
The difference between the share flag and the post flag is that the share flag controls who can see the diary entry. The post flag controls whether someone can comment on the diary entry or not. They can be the same lists but they don't have to be.
To make a post only visible to the user him/herself, the share flag should be set to "Include these usernames:" and then the list of usernames should be left blank.
You have the ability to post anonymously in forums that allow it. You can also set your forum to force anonymous posting which means everyone who posts does so anonymously. Please be aware that while you can post anonymously, the rules of the site still apply. Posting anonymously isn't an excuse to break the rules.
Verified Pro
You can apply for a verified pro listing on IAM. The application for verified pros can be found by going into edit account & profile and choosing the IAM PRO option.
If you are a verified pro and would like to add a banner to your page you can use one of the following:
Downloading Your Content
To backup your diary entries, go to Edit Profile & Account. Under My Content choose Diary Entries. In the main box you will see a link that says Backup Entries. Clicking that link will download a .txt file of all of your diary entries.
Likewise, you can use the following link (you must be logged in to your account for this work):
www.bme.com/accounts/profile/journals/YOUR IAM NAME/journals_backup/
Replace YOUR IAM NAME with your actual IAM user name.
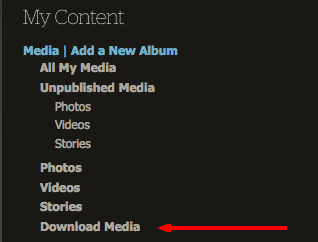
To backup the media in your account, click on Media in the same location. Below that you will find a link to Download Media.
Or you can click below to go directly to the link: Download Media
Deactivating IAM
You can deactivate your IAM page by going to your profile settings and choosing Security Settings under the Personal Information section. Scroll down to Privacy Options and the first check box option is Deactivate my IAM page.
If you want to reactivate your IAM page, you will need to write to BME support to make that request.


