Chipped Teeth and Luer Connector: Difference between pages
(Created page with "<html><div class="mw-content-ltr" dir="ltr" id="mw-content-text" lang="en"><p><br/> Teeth will break if you bite down on something that's harder than them — <b>chipped teeth</b> is by far the most common risk for oral piercings (primarily <a class="mw-redirect" href="/index.php?title=Tongue_piercing" title="Tongue piercing">tongue piercings</a>). It's a simple common sense fact that if you bite down hard on a piece of metal, like a steel bead on the end of a steel barb...") |
(Page conversion via llm-mediawiki-rev -jwm) |
||
| Line 1: | Line 1: | ||
[[File:Luer_Connector-1.jpg|thumb|right|300px]] | |||
'''Luer connection''' systems are the standard way of attaching syringes, catheters, hubbed needles, IV tubes, and so on to each other. They consist of round male and female interlocking tubes, slightly tapered to hold together better with even just a simple pressure/twist fit. '''Luer connections''' can either be just that (''luer slip''), or can have an additional outer rim of threading (a ''luer lock''), allowing them to be far more secure. | |||
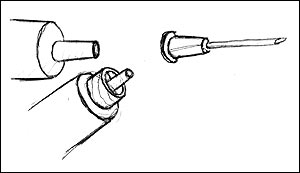
In the (somewhat luddite) diagram to the right, on the right is the female half of a luer connector, which can fit onto both a luer slip or luer lock male connector. The male connectors are shown on the left. The top one is a male luer slip, the tip of which inserts into the female half of the connector. The bottom one is a luer lock, which is the same as the luer slip but adds the threaded rim. The inner nipple still inserts inside the female half, but the rim around the base of the female half screws into the rim, thereby locking it in place. | |||
[[File:Luer_Connector-2.jpg|center|460px]] | |||
''Above (l-r): hypodermic needle with female luer connector, | |||
syringe with luer lock connector, syringe with luer slipconnector.'' | |||
Some people decide to remove the Luer lock hub from needles to convert hypodermic needles into [[Piercing needle]]. This can be done a variety of methods, including soaking the needle in a solvent that breaks down the glue (many hubs are simply glued to the needle), removing it by crushing the hub and then grinding or burning off any glue, or simply by cutting off the needle in front of the hub. | |||
== See Also == | |||
* [[Catheter Tip]] | |||
* [[Hypodermic Needle]] | |||
* [[Syringe]] | |||
Latest revision as of 07:21, 17 September 2023
Luer connection systems are the standard way of attaching syringes, catheters, hubbed needles, IV tubes, and so on to each other. They consist of round male and female interlocking tubes, slightly tapered to hold together better with even just a simple pressure/twist fit. Luer connections can either be just that (luer slip), or can have an additional outer rim of threading (a luer lock), allowing them to be far more secure.
In the (somewhat luddite) diagram to the right, on the right is the female half of a luer connector, which can fit onto both a luer slip or luer lock male connector. The male connectors are shown on the left. The top one is a male luer slip, the tip of which inserts into the female half of the connector. The bottom one is a luer lock, which is the same as the luer slip but adds the threaded rim. The inner nipple still inserts inside the female half, but the rim around the base of the female half screws into the rim, thereby locking it in place.
Above (l-r): hypodermic needle with female luer connector, syringe with luer lock connector, syringe with luer slipconnector.
Some people decide to remove the Luer lock hub from needles to convert hypodermic needles into Piercing needle. This can be done a variety of methods, including soaking the needle in a solvent that breaks down the glue (many hubs are simply glued to the needle), removing it by crushing the hub and then grinding or burning off any glue, or simply by cutting off the needle in front of the hub.

